NWDI is basically for Developers who are working on Portal or J2ee engine. Developers are required for developing webdynpro application - j2ee engine and portal server.
It provides a team environment for developers working development landscape.. Infrastructure..
Components of NWDI:
DTR – Design time repository
CBS – Central Build Services
CMS – Change management system
SLD – System Landscape Directory
DTR – provides a central location for storing applications, software, software components or development components.
CBS – it stores or gives access to default libraries required for development software components.
CMS – its helps in transporting development components to different runtime systems.
1.Development system
2.Test Quality system
3.Consolidation system
4.Production system
It provides automatic transportation.
SLD – collection of systems in the organization.
TRANSPORT PACKAGES
Transport package is a collection of various PCD(Portal Content Directory) objects like iviews, pages, worksets, roles, portal themes, portal desktop etc..
The extension of a transport package is .epa (enterprise portal archive)
A transport package can contain another transport package.
The purpose of creating transport package is to export and import the PCD objects from one server to another server.
DEV >TEST
TEST >PRD
DEV > PRD

The extension of a transport package is .epa (enterprise portal archive)
A transport package can contain another transport package.
The purpose of creating transport package is to export and import the PCD objects from one server to another server.
DEV >TEST
TEST >PRD
DEV > PRD
Role Activities
The activities Involved in system administration Role:
1. Creating System objects
2. Portal Display for Changing Look and feel of portal according to client preference
3. Transport of packages ie. Import and export from one server to another
4. Locking and unlocking the portal Content objects
5. Monitoring the services related to portal
6. Permissions for portal objects
7. Provides Support Platform for initial troubleshooting
The activities involved in User Management Role:
1. Creating Users, Roles, Groups in Portal
2. Locking/unlocking Users, Roles, Groups in Portal
3. Exporting Users, Roles and groups from portal
4. Assigning Roles to users or groups (group is a collection of users)
5. User Mapping for Backend Systems from portal.
6. Batch Import of Users, Roles , Group Data into portal. The purpose of Batch Import is to create ‘n’ number of users, roles and groups into portal simultaneously.
7. We can view the activity Reports which can give the information about currently logged in users.
The Activities involved in Content Administration Role:
1. Creation of Iviews, Pages, Worksets, layout and folders. (The objects are considered as PCD objects – Portal Content Directory objects)
Predefined Roles given by SAP in portal
The Predefined Roles given by SAP in portal:
1. System Administration
2. Content Administration
3. User Administration
Other Roles available in Portal Area:
1. ESS Role
2. MSS Role
3. VC Role
4. NWDI Role
5. GP Role
6. EU Role
7. Super Admin Role
Super Admin Role is a composite role which contains three pre-defined roles
1. Content Admin
2. System Admin
3. User Admin
Important Urls to access various predefined Portal Applications
IMPORTANT URLS
1. To access Enterprise Portal
http://hostname:portno/irj/portal
2. To access SLD
http://hostname:portno/sld
3. To access NWDI
http://hostname:portno/devinf
4. To access WebDynpro Content Administration
http://hostname:portno/webdynpro/welcome/Welcome.jsp
5. To access User Administrator
http://hostname:portno/useradmin
6. To access Portal Server System Properties
http://hostname:portno/index.html
7. To access Support Platform for Initial Troubleshooting
http://hostname:portno/sp
8. To access Visual Composer
http://hostname:portno/VC
9. To access Composite Application Framework Administration
http://hostname:portno/caf
10. To Administer Web Services
http://hostname:portno/wsnavigator
Changing the Look and Feel of Enterprise Portal Application
Changing the Look and Feel of Enterprise Portal Application.
Default Framework Page:
Default Framework page defines the default layout of the portal application.
Default Framework page contains:
1. Mast Head (Branding Imaging and Company Logo)
2. Tool Area (Search functionality)
3. Roles
} - Top Level Navigation
4. Workset
5. Page Header
6. Detailed Navigation
7. Content Area {Inner Page}
Portal Theme is required to change Look and feel (Branding image, company logo, fonts, colors etc) according to client preferences or enduser requirement.
The predefined theme templates given by SAP :
1. SAP High Contrast Black
2. SAP High Contrast
3. SAP Chrome
4. SAP Streamline
5. SAP TradeShow
Theme Editor is used to design our own themes.
Creating Portal Desktop and theme:
1. Logon to Portal
2. Goto System Administration
3. Goto Portal Display
4. Theme Editor
5. Select one of the Theme template
6. Change Branding Image, company logos, fonts, colors etc..
7. Click on Save As and specify
9. Click Save again.
10. To make same changes in Roles + Workset etc under Top-level navigation
11. Save
12. Create a Desktop:
13. Click on Desktops and Display Rules
14. Right Click on Portal Conent ->New -> Portal Desktop
15. Specify Portal Desktop Name: Class Desktop
Desktop ID: Class Portal Desktop
(Portal Desktop Editor allow us to create portal desktop)
(Portal Desktop can contain Framework pages and Themes)16. Expand portal content -> Expand Themes
17. Right click on your theme and Select “Add theme to Portal Desktop”
18. Assigning Framework page to Desktop:
19. Expand Portal Users -> Expand standard Portal Users
20. Right Click on Default Framework page and select “Add Framework Page to Desktop”
21. Click on Save.
22. Creating Rule Collections:
23. Rule collection is used to assign portal desktops, portal themes to corresponding users, groups, roles, browsers etc.
24. Expand Portal Administrators -> Expand Super Administrators and right click on “Master Rule Collection” -> open -> Object
25. Rule collections are used to assign ‘Portal Desktop’ to Portal endusers.
26. A Role collection contains IF, THEN expression condition
If user = *
Then Portal Desktop = Select or click on portal desktop path/link
Goto portal content, right click on our created Desktop and “Add portal Desktop to expression” and click on ‘Apply’
Click Save
27. To check logoff and re-login
The Portal Desktop can be assigned based on : -
1. User
2. Roles
3. Groups
4. Bandwith
5. Browser type
6. Browser version
7. Url Alias
Default Framework Page:
Default Framework page defines the default layout of the portal application.
Default Framework page contains:
1. Mast Head (Branding Imaging and Company Logo)
2. Tool Area (Search functionality)
3. Roles
} - Top Level Navigation
4. Workset
5. Page Header
6. Detailed Navigation
7. Content Area {Inner Page}
Portal Theme is required to change Look and feel (Branding image, company logo, fonts, colors etc) according to client preferences or enduser requirement.
The predefined theme templates given by SAP :
1. SAP High Contrast Black
2. SAP High Contrast
3. SAP Chrome
4. SAP Streamline
5. SAP TradeShow
Theme Editor is used to design our own themes.
Creating Portal Desktop and theme:
1. Logon to Portal
2. Goto System Administration
3. Goto Portal Display
4. Theme Editor
5. Select one of the Theme template
6. Change Branding Image, company logos, fonts, colors etc..
7. Click on Save As and specify
- Theme Name: ClassTheme
- Theme ID: ClassTheme
- Folder ID: portal_content/themes
9. Click Save again.
10. To make same changes in Roles + Workset etc under Top-level navigation
11. Save
12. Create a Desktop:
13. Click on Desktops and Display Rules
14. Right Click on Portal Conent ->New -> Portal Desktop
15. Specify Portal Desktop Name: Class Desktop
Desktop ID: Class Portal Desktop
(Portal Desktop Editor allow us to create portal desktop)
(Portal Desktop can contain Framework pages and Themes)16. Expand portal content -> Expand Themes
17. Right click on your theme and Select “Add theme to Portal Desktop”
18. Assigning Framework page to Desktop:
19. Expand Portal Users -> Expand standard Portal Users
20. Right Click on Default Framework page and select “Add Framework Page to Desktop”
21. Click on Save.
22. Creating Rule Collections:
23. Rule collection is used to assign portal desktops, portal themes to corresponding users, groups, roles, browsers etc.
24. Expand Portal Administrators -> Expand Super Administrators and right click on “Master Rule Collection” -> open -> Object
25. Rule collections are used to assign ‘Portal Desktop’ to Portal endusers.
26. A Role collection contains IF, THEN expression condition
If user = *
Then Portal Desktop = Select or click on portal desktop path/link
Goto portal content, right click on our created Desktop and “Add portal Desktop to expression” and click on ‘Apply’
Click Save
27. To check logoff and re-login
The Portal Desktop can be assigned based on : -
1. User
2. Roles
3. Groups
4. Bandwith
5. Browser type
6. Browser version
7. Url Alias
Java Instance Startup Process

At first, on command 'startsap' - the Database is started first, then the SAP Central Services and then starts the Java Dispatcher and Server Process along with SDM. Jcontrol is started which internally starts Jlaunch process.

System Object
To connect to SAP backend system from SAP J2ee engine(portal), as an administrator we need to use ‘SAP System using dedicated application server’ which is a predefined system template.
System object should be created for providing communication between portal and ABAP engine. System Objects are used for connecting different SAP and Non-SAP Systems like ur ECC, CRM, SRM,4.7, Oracle, RDBMS, File repositories like Lotus Dominos, MSExchange...etc.
As part of system object, we need to specify various connection parameters which can recognize ABAP engine.
System object should be created using System Admin Role under portal environment.
The various parameters that should be specified as part of system object are:
1. Application host
2. Gateway Host
3. Gateway Service
4. SAP client
5. SAP SID
6. SAP System Number
7. SAP LSN (Logical system name)
8. Remote Host type
9. SAP System type.
Note: There are three types of logon methods to connect to SAP System:
1. UIDPW – UserName & Password
2. SAP Logon Ticket – Only username
3. X509 Certificate – it contains digital signature
Every System object contains a System Alias. System Alias should be created to hide the connection properties available under system object.System Alias is another name or dummy name for System object. System Alias doesn’t contain any connection properties but instead will refer to system object.
User Mapping – The frontend portal users should be mapped with backend system users and password. User mapping should be performed under User Admin role.
Steps for Creating System Object:
• Logon to Portal
• Select System Administration -> System configuration
• Right click on Portal Content -> New -> System (from template)
• From template selection, select “SAP System using dedicated Application server”
• Click Next
• Specify System Name and System ID : ECC_SYSTEM (any related name)
• Click Next and Finish
• Open the Object for editing – OK
• From Property Category – Select “Connector”
• Under Connector, define the following parameter values:
• From Property Category – Select “User management”
• Specify Logon Method: UIDPW
• Select user mapping type – Admin, user
• Click Save
• From Display menu – select “System Aliases”
• Specify System Alias name : ECCALIAS
• Click Add
• Click Save
This creates the system object pointing to remote ABAP system.
Now goto User Administration for performing User Mapping
Search for the user and select the user.
Click on Modify
Select “User Mapping for system access” tab
Select Created System Alias Name: ECCALIAS
Enter or specify ABAP userid and Password.
Click Save
System object should be created for providing communication between portal and ABAP engine. System Objects are used for connecting different SAP and Non-SAP Systems like ur ECC, CRM, SRM,4.7, Oracle, RDBMS, File repositories like Lotus Dominos, MSExchange...etc.
As part of system object, we need to specify various connection parameters which can recognize ABAP engine.
System object should be created using System Admin Role under portal environment.
The various parameters that should be specified as part of system object are:
1. Application host
2. Gateway Host
3. Gateway Service
4. SAP client
5. SAP SID
6. SAP System Number
7. SAP LSN (Logical system name)
8. Remote Host type
9. SAP System type.
Note: There are three types of logon methods to connect to SAP System:
1. UIDPW – UserName & Password
2. SAP Logon Ticket – Only username
3. X509 Certificate – it contains digital signature
Every System object contains a System Alias. System Alias should be created to hide the connection properties available under system object.System Alias is another name or dummy name for System object. System Alias doesn’t contain any connection properties but instead will refer to system object.
User Mapping – The frontend portal users should be mapped with backend system users and password. User mapping should be performed under User Admin role.
Steps for Creating System Object:
• Logon to Portal
• Select System Administration -> System configuration
• Right click on Portal Content -> New -> System (from template)
• From template selection, select “SAP System using dedicated Application server”
• Click Next
• Specify System Name and System ID : ECC_SYSTEM (any related name)
• Click Next and Finish
• Open the Object for editing – OK
• From Property Category – Select “Connector”
• Under Connector, define the following parameter values:
- Application Host:
- Gateway Host:
- Gateway Service:
- SAP Client no:
- SAP System ID:
- SAP System no.:
- Server Port:
- SAP System type:
- Remote Host type:
- Logical System Name:
• From Property Category – Select “User management”
• Specify Logon Method: UIDPW
• Select user mapping type – Admin, user
• Click Save
• From Display menu – select “System Aliases”
• Specify System Alias name : ECCALIAS
• Click Add
• Click Save
This creates the system object pointing to remote ABAP system.
Now goto User Administration for performing User Mapping
Search for the user and select the user.
Click on Modify
Select “User Mapping for system access” tab
Select Created System Alias Name: ECCALIAS
Enter or specify ABAP userid and Password.
Click Save
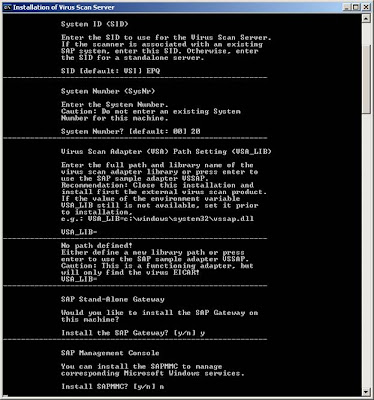
Installation of Virus Scan Server on SAP
Following are the screens which helps with the installation of SAP Virus Scan Server in Netweaver2004s.


Configuring Employee Self Service ESS MSS
Employee self services
The Business Package for Employee Self services helps streamline administrative tasks common to large numbers of employees within the organization such as creating, displaying, and changing their own HR – related data in the Enterprise Portal. It covers data from various business areas like:
• Benefits and Payment
• Working time
• Career and Job
• Employee Search
• Personal Information
• Travel Management
• Corporate Information
• Life and Work Events
The Business package does not contain any business applications. Instead, it contains Iviews that enable you to call Webdynpro Applications and display these applications in the SAP Enterprise Portal.
These Webdynpro applications are delivered with the SAP ECC Human Resource Extension (EA-HR) component.
Pre-requisites
1. Installed BP-ERP and XSS usage type with SAP ECC and SAP Netweaver 2004s or BP Employee Self Service (ERP 2004 or 2005)

2. Installed SAP EP
3. Configured SAP EP System Landscape Directory with WEB AS ABAP (ECC) and WEB AS JAVA (EP)

Deployed Employee Self-Service package is available under Portal Content – End User Content

Setting up SAP JAVA Connectors for Employee Self Service
Logon to WebDynpro Content Administrator on EP server using the following URL:
http
Choose Maintain JCo Destinations. From the list of JCo Destinations, configure/activate the following JCo Destinations:
1. SAP_R3_HumanResources
2. SAP_R3_HumanResources_MetaData
3. SAP_R3_Financials
4. SAP_R3_Financials_MetaData
5. SAP_R3_SelfServicesGenerics
6. SAP_R3_SelfServicesGenerics_MetaData
7. SAP_R3_SelfServicesGenerics_FIN
8. SAP_R3_SelfServicesGenerics_FIN_MetaData
9. SAP_R3_Travels
10. SAP_R3_Travels_MetaData

Hint: Use SAPLogonTickets for all Model Data Destinations and UIDPW for all MetaData Destinations
Creating System Objects in SAP EP server
The following System objects and System Aliases has to be created under System Administration- System Configuration – System LandScape
The Backend system information needs to be given while creating the system alias
a. Create a System for ERP HR and BSP Applications
b. Create a System for Portal for Webdynpro
c. Create an ITS based System
a. Create a System SAP_R3 for ERP HR and BSP Applications with Connector and WAS properties.
WAS properties used here for BSP Applications:
WAS Description : ECC WAS
WAS Host name :
WAS Path :
Add the following System Aliases:
SAP_R3
SAP_BSP_EREC
SAP_Financials
b. Create a System SAP_WebDynpro_XSS for Portal Webdynpro with following WAS properties;
WAS Description : J2EE WAS
WAS Host name :
WAS Path :
Add the following System Alias:
SAP_WebDynpro_XSS
c. Create an ITS based System SAP_ITS_EBU with following ITS properties:
ITS Description : SAP ITS
ITS hostname :
ITS path :
Add the following System Alias:
SAP_ITS_EBU

Create an EP user ESSUSER and assign ESS and MSS role:

Create a Composite role Z_Roles (ZSAP_EMPLOYEE_ERP) by copying all the single roles contained in role SAP_EMPLOYEE_ERP
SAP_EMPLOYEE_ERP role consists of the following single roles:
SAP_BC_EMPLOYEE ZSAP_BC_EMPLOYEE
SAP_BC_ENDUSER ZSAP_BC_ENDUSER
SAP_ESSUSER_ERP ZSAP_ESSUSER_ERP
SAP_HR_EMPLOYEE_DE_ERP ZSAP_HR_EMPLOYEE_DE_ERP
SAP_HR_EMPLOYEE_US_ERP ZSAP_HR_EMPLOYEE_US_ERP
SAP_HR_PA_XF_EXPERT ZSAP_HR_PA_XF_EXPERT

Create an SAP user ESSUSER and assign the ZSAP_EMPLOYEE_ERP role to it.
Assign ESSUSER with corresponding Employee using HRUSER Transaction code:

Select an Employee and press Assign employees
Click on Create Relationship to build a relationship between employee and the user.
Login to SAP Enterprise Portal with ESSUSER with assigned ESS/MSS roles
Result:


Portal Skills Overview
Overview:
1: Introduction
2: Technical Infrastructure
3: The End User’s Perspective
4: Design Changes and Branding
5: Portal Platform Content
6: Integrating SAP Applications
7: User Administration and Authentication
9: SAP Enterprise Portal Installation and Configuration
10: Post Installation
11: Development Infrastructure
12: Single SignOn to Backend Systems
1: Introduction
- SAP Netweaver
- Introducing The SAP Enterprise Portal
2: Technical Infrastructure
- Architectural Overview
- Java Cluster Architecture
- Terms & Terminology
- Default URLs/Ports
3: The End User’s Perspective
- Logging onto and Navigating in SAP Enterprise Portal
- Predefined Roles–System Administration, Content Administration, User Administration
- Activities Involved
4: Design Changes and Branding
- Portal Branding–Look and Feel, Portal Theme,Portal Desktop
- Customizing Logon Screen
5: Portal Platform Content
- Portal Content
- Working with iViews
- Working with Pages
- Working with Worksets and Roles
- Internationalization
6: Integrating SAP Applications
- Defining a Backend System Landscape
- System Templates for Backend Connectivity
- JAVA Connectors(JCo)
- Transport Packages
7: User Administration and Authentication
- How to Configure the User Management Engine(UME)
- Creating Users/Groups/Roles
- Batch Import Users/Groups/Roles
- Portal Authorization Concept
9: SAP Enterprise Portal Installation and Configuration
- Preparing the Portal Installation
- Installing SAP WebAS Java System
- Portal Installation
- Applying Portal Patches
- Deploying Packages(ex.Ess/Mss)using SDMGUITool
10: Post Installation
- Post Installation Activities
- Settingup System Landscape
- Installing & Configuring Developer Studio
- Configuring Visual Composer
11: Development Infrastructure
- NWDI (Netweaver Development Infrastructure) Configuration & Architecture
- NWDI Components–DTR, CBS, CMS, SLD
12: Single SignOn to Backend Systems
- Introducing SAPLogonTicket
- SSO using SAPLogonTickets
- SSO using UserMapping
SAP Netweaver Portal Made Simple Online

Hi friends,
I am writing here to help one of my friend who has got a project on SAP EP - ESS (Employee Self Service) implementation. As he is new to SAP Enterprise Portal, he finds himself in a difficult situation when some new task is assigned to him which he is unaware.
There are thousands of articles, documents, posts, forums and even blogs based on SAP. However, here I would be posting articles based on my knowledge. Everyone including my friend, are welcome to gather information and also provide open suggestions and guidelines which would help our fellow consultants.
To begin with, I would like to post the basic design or the roadmap to SAP Enterprise Portal which includes both Administration as well as Content Development.
Down the line under EP Administration, we have:
- Installation
- Configuration
- ESS|MSS Configuration
- NWDI configuration
- SSO configuration
- etc,.
- Webdynpro Development
- Visual Composer
- ESS|MSS custom Development
- Webdynpro for JAVA
- Webdynpro for ABAP
Subscribe to:
Posts (Atom)